![]()
![]()
From June 2000
Click on pattern to view and download.
Copyright ã L.Hoad 1999
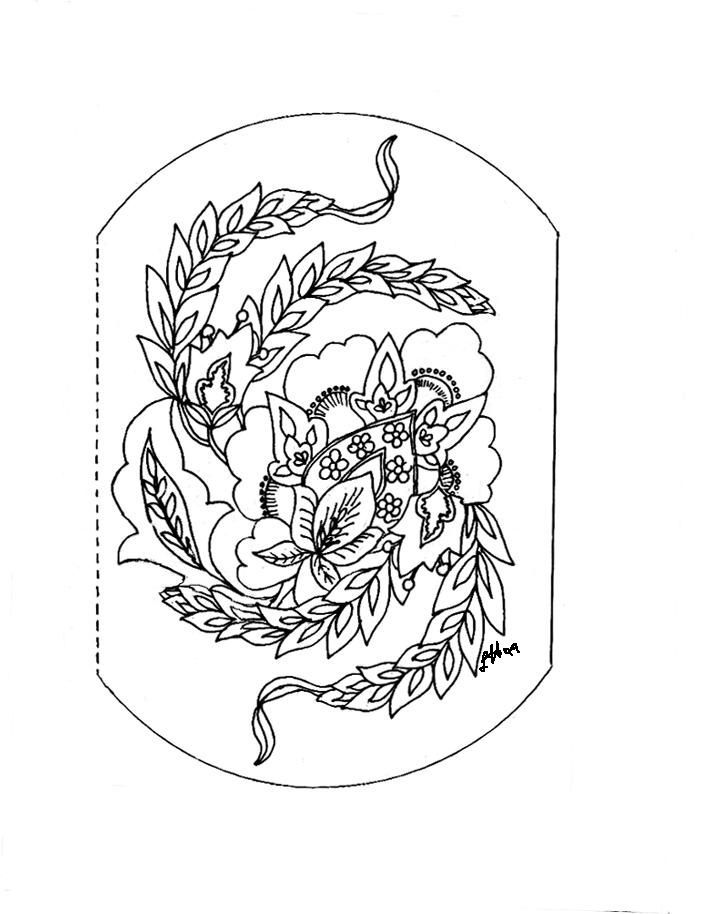
Swirl Pattern by Lindy Hoad
Materials
1 sheet A4 parchment paper
PCA Perforating mat and Special Embossing mat
White ink, gold ink and mapping pen
Gold metallic oil pastel crayon
PCA StampEdge (Bold) and Bold MiniStampEdge
PCA UniBold and/or PCA BoldTwin
PCA QuinTool ( fine)
PCA TriCorner Bold
PCA Shader
PCA Large and medium ball embossers
PCA Scriber
Scissors
Method
Colouring
Trace the centre graphics and border lines in White ink or Gold ink by following photo of finished card to see which colour to use. Then fill in the solid colour details of gold where appropriate using a mapping pen. Keep a separate pen for use with inks metallic in pigment than you use for white, rinse nib frequently.
Use the gold oil pastel on the reverse side of the card in parts shown to shade the interior areas on the centre graphic. This can be spread using a small piece of pantyhose to blend the colour to the outlines evenly.
Embossing
Using the Special Embossing mat beneath for all embossing, use the PCA Shader, on reverse shade gradually embossing the outer portions of all scalloped or leaf like areas as in photo, with a gradient effect. This is achieved by holding the Shader (elbow of Shader downward) tip directly on the inner edge of the traced line and very slightly dig the tip into the paper... then as you drag the tip towards the centre of the area to be worked on, you evenly and gradually lift the pressure up and away from the paper. Almost a striking effect, this achieves a whiter embossing near the outlines that becomes lesser and slowly more grey till to nothing as you reach into the mid portions of the area you are working on. Place the Shader back on the traced outline and repeat motion, turning your work as you go, filling in the entire shape with graduated embossing.
If you desire you can ensure that there are no gaps missed at the outline by smoothing over the inner edge with your PCA LargeBall tip embosser, but if you are careful in placing the Shader tip right on the inner side of traced line when you commence each stroke, you should not have to do this.
Using the PCA LargeBall emboss ( from reverse) the outer leaf portions and other areas shown as having an even white solid embossing, such as small flowers.
The MediumBall is used to indent the small dots of embossing in between each perforation in the two rows of outside border perforations as described later using the TriCorner Bold and QuinTool.
Stippling
Using the PCA Scriber on the reverse of paper, holding it perpendicular to page make a multitude of single dots as closely together as you can get in the areas shown in photo. The closer and the more stippling movements you make, the better the stippling will look in terms of whiteness (which can also be encouraged with a light colouring on back with a white pencil, optional) and texture. Use a very firm cardboard underneath it and try not to pierce the paper at any time as you stipple.
Perforating
The paper pricking look around the outlines of the graphics is achieved by using a PCA UniBold ( or even a PCA BoldTwin for even easier accurate spacing between perforations, using the UniBold for tightspots and corners) to perforate around the entire outline as shown, following the trace lines with an even spacing as you go. This was done from the reverse of work, so the texture of the perforation is shown on the front.
The cut out areas are removed by using the PCA StampEdge (4 needles in a row) in larger areas and it's companion (2 needles in a row, close set) PCA Bold MiniStampEdge in those very small areas and around corners. These tools are used by holding them at an angle of 50-60 deg and sliding the needles into the paper along the line on side to be removed. They perforate and the paper is torn away as it goes in one action, leaving a scallop/stamplike edge.
Finishing
The Outer Border : Perforate along the outerside of the gold border line all the way around card with the PCA QuinTool(fine). Use the size of each perforation as a blank space between that and your next perforation for spacing, giving the tool a little twist both to the left and right before removing from the paper. In that blank spot in between : emboss a small dot ( as mentioned before) and colour it in gold ink all the way around.
The very outer Picot Edge is achieved by using the PCA TriCorner Bold Tool. Perforate the entire outside border line, with this tool, placing the first triangle base needle into the hole of the last as a guide to placement. You will have a long string of peaked triangle points all pointing outward from the card. Using the PCA MediumBall embosser, make a small dot of embossing ( from reverse) in the centre of each triangle shape.
Now, fold the card in half along fold line and using scissors, cut the bonds between the outer peaks leaving a line of small embossed Picot edge like shapes.
